Creating a Chatbot for Your Firm — that Uses Your Own Docs
Want a chatbot that answers questions using your firm's own documents instead of generic internet knowledge? This step-by-step n8n walkthrough shows you how to build one—no coding background required.


Phase 1
Creating a new workflow
Workflows are the basic canvas for building out a given automation task in n8n.

Tab Name: Workflow Automation - n8n
Click on Add first step

Click “On chat message”

Go back to the main canvas

Click on the plus sign to add the next step in the flow

Click on Advanced AI

Select AI Agent

Go back to the main canvas

Click on the plus sign by “Chat Model”

Select your chat model (I’m using OpenAI in this guide)
People get hung up on which model is "best." While there are some objectively measured outcomes that try to answer these questions, if you are here, you don't need to worry about that yet.

Click on the Credential Area to select or create your API credentials for OpenAI
If you don't know how to set up credentials, there is a little "Docs" button when you create your credential. I'll make an OpenAI-specific walkthrough and put it here when it's ready, but here is an example of setting up credentials for a Google API.

Go back to the main canvas

Click on the plus sign next to “Memory”

Select Simple Memory, or the memory option of your choice
Memory is what allows the chatbot to maintain the context of the conversation. You can have multiple conversations going in their own silos, or you can have one big conversation that encompasses all of your conversations with your bots. For now, don't worry too much about it. Let's get your bot up and running first.

Back to canvas without changing anything

Click the plus sign next to “Tool”

Select Simple Vector Store, or the vector store of your choice
A vector store is like a filing cabinet where the AI knows to look for specific types of documents. If you want to know more about memory and vector stores, see this post or get CLE credit for watching the video here.

Setting the name of your first vector store. Best practice is to use all lowercase letters and no punctuation or spaces. Let’s do “general_information_tool” for simplicity.

Let’s rename the node itself to the same name as the vector store for simplicity.

Let’s update the description to “Use this vector store to retrieve general information about my firm.”

Go back to canvas

Every so often you can click the “Tidy Up” icon to keep things organized

Let’s add another tool by clicking on the plus button next to “Tool”

Again select a Simple Vector Store or the vector store of your choice

Let’s change the name of this vector store to texas_penal_code_information_tool (or you can change it to something else if you want to use a different data set)

Let’s rename the Node to the name of the tool, texas_penal_code_information_tool, for simplicity

Add a description like, “Use this vector store to retrieve information related to crimes of all types in the state of Texas.” Then go back to the canvas.

Click on the plus button next to “Embedding” on either of your tool nodes.

Select your embeddings provider (I’m using OpenAI but other providers are fine).

Make sure to select or create your credential then go back to the canvas.

Click to drag the plus sign by the word “Embedding” on the other tool node and drag it to the “Embeddings OpenAI” node.

I’ll tidy up again

I’ll save here as well to avoid any lost progress

Phase 2
Click on the button "Open nodes panel Tab"

Click on "Simple Vector Store" or whichever vector store you selected above

Click on "Add documents to vector store"

Click on "Simple Vector Store" and let’s rename it to something connected to your other vector stores, like “general_information_tool Vector Store”

Let’s rename the memory key to something relevant, like “general_information_tool_store,” then go back to the canvas.

Click on the "Embedding" plus button next to the vector store node.

Click on "Embeddings OpenAI" or the provider you used above.

Click on the button "Embedding Document general_information_tool Vector Store"

Click the plus sign next to “Document Loader” on the vector store node.

Change the Type of Data from JSON to Binary

Select “Add Option”

Click on "Split Pages in PDF", then go back to the canvas.

Click on the plus button "Document Text Splitter" next to Default Data Loader.

Click on "Recursive Character Text Splitter"

Change the Chunk Size to 4000 and the Chunk Overlap to 400.
Chunk size is the length in characters that is snipped from the provided content, and chunk overlap is how many characters back from the end of the previous snippet to begin the next snippet. This is useful for maintaining the context of the returned results for the AI so things aren't cut in strange ways.

Go back to canvas

Click on the button "Open nodes panel Tab"

Click on "Google Drive," or the document manager of your choice.

Click on "Triggers" near the bottom

Click on "On changes involving a specific folder"

Select or create your credential for the Drive Node.

Select the folder you will be using to store the documents you want the bot to rely on for the law firm general knowledge.

Click on “Watch For”

Select "File Created”

Click on "Back to canvas"

Drag the plus sign from "Google Drive Trigger" to the vector store.

Tidy up

Hover over the line between the Google Drive trigger and the vector store, then click on the plus button to add a new step.

Select "Google Drive," or whichever document manager you selected previously.

Click on "Download file"

Change “From list” to By ID

Click on "Expression"

Type in “ {{ $json.id }} ”, it will be gray and won’t look like anything happened. That’s normal. Return to canvas.

Select your Google Drive Trigger and all accompanying nodes.

Right-click and select "Duplicate 6 nodes"

Click on the button "Tidy Up ⇧ Alt T"

Double click on the new Google Drive Trigger

Select the second folder where you hold the other set of documents. For my demo purposes, I'm just using a generic folder for the Texas Penal Code.

Double click on the new Embedding Document node

Change the node name and Memory Key to “texas_penal_code_information_tool_store” or something that is relevant for you.

Click on "Back to canvas"

Now let’s go back up to the top and make sure our Memory Key in the tool matches the Memory Key in the store


Go back to the canvas

Check the other tool


Click on "Back to canvas"

Click here to activate the flow

Click on the button "Got it"

Go to your Google Drive Folder for your law firm information knowledge
Click on the button "New"

Click on "File upload" and upload the relevant file. Repeat this file upload step with your other folder. If you want to use the Texas State Penal Code like I am, here is the link.

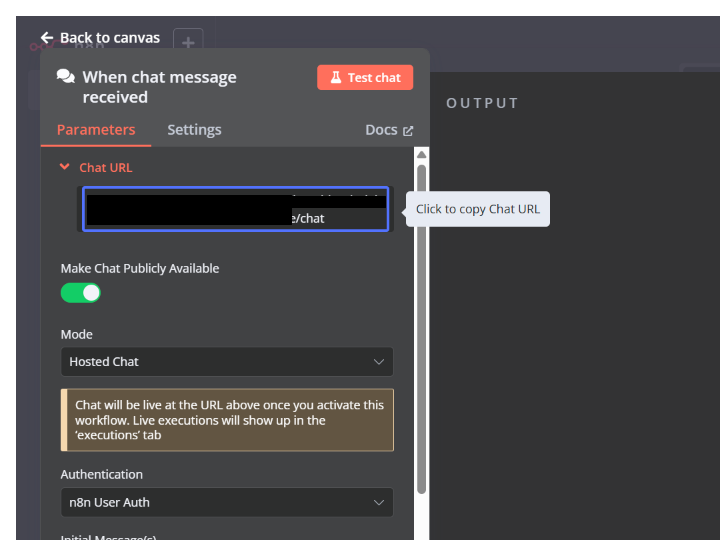
Go back to n8n. Double-click on the button "When chat message received Open chat"

Turn on publicly available chat and set the Authentication to “n8n User Auth.” Click on the chat URL to copy it to your clipboard
Open the link and make sure the bot is working.


Back on n8n, go back to canvas

Double-click on your AI Agent node

Click on the input to add options

Select "System Message"
The system message can be thought of as the personality or directive of the bot.

Add a message in the input box along these lines:
You are an AI assistant who answers questions for users. You look for answers in the documents.
You have access to one vector store with the Texas Penal Code, and another vector store with information about my law firm.
Always access the documents before answering questions. If the answer isn't present in the vector stores, say "I don't know."
Click on "Back to canvas"

Go back to the chat and try again.


Back in n8n, click on the "Executions" tab.

Click on the link for whatever is the most recent (top) result to see what happened underneath the hood.

Double-click on the texas_penal_code_information_tool (or whichever tool had a response in your most recent interaction with the bot).

Click on "Logs"

Click on "Output"

You’ll see a bunch of meaningless (to us) numbers — that’s how the AI sees your information and prompts.

Go back to "Output"

This is the human-readable version of what the AI saw. We can read it because the “Embeddings” node is translating the numbers for us.

You’ll see the basis of the AI’s answers here.


Let’s go back to the canvas and make another tweak.

Click on "Editor"

Re-open the AI Agent node by double-clicking on the node.

Let’s adjust the system message just a little bit.

Let’s add a final paragraph:
If you retrieve an answer from the Penal Code vector store, include any citations to the specific statute, if present.
Try the chat again to see if anything changed.

Click here

Verifying the information

I believe that learning the tech is the way law will be done in the next five to ten years, so I encourage you to try the walkthrough. Paid membership required for the actual code snippets. Click to jump back up.